Jumat, 02 Desember 2011
Seni Menakjubkan Dari Secangkir Kopi
 .
.yuhu...
Latte Art adalah seni membuat pola atau desain di permukaan susu. Ahli pembuat seni ini disebut barista [italian: pelayan bar]. Biasanya seni ini dituangkan diatas media kopi. Berikut beberapa seni Latte, hehhe..jadi g tega minum


Resep Wafel Belgia
Wafel Belgia adalah wafel yang terenak di dunia! Walau hampir mirip dengan wafel biasa, namun wafel ini lebih crispy dan lezat karena adanya ragi (yeast). Berikut ada resep untuk membuatnya, kalian mesti coba!
Untuk resep wafel Belgia yang dasar, kita akan memerlukan:
3 ¼ cangkir (500 gram) tepung terigu
1 sachet (7 gram) ragi kering / fermipan
4 telur
Susu sapi murni (Bisa dicamput air mineral supaya tekstur wafel lebih lembut)
250 gram mentega
Gula vanilla
Garam
Minyak

Bahan sudah lengkap? Bagus! Sekarang kita akan mulai membuat wafel Belgia dalam 9 langkah mudah!
1. Ambil secangkir susu dan panaskan hingga suam-suam kuku, lalu campur dengan ragi / fermipan. Sekarang kita bisa meninggalkan susu campur ragi itu untuk sementara.
2. Panaskan mentega, tapi segera hentikan begitu mentega sudah cair, jangan panaskan sampai berlebih (atau bahkan menggosongkannya!), karena rasanya akan menghilang.
3. Pisahkan kuning telur dengan putih telur. Kocok putih telur hingga menjadi busa / salju.
4. Sekaang ambil baskom yang SANGAT BESAR, masukkan semua tepung, gula vanilla (1 sachet) dan sedikit garam. Buat lubang di tengah-tengah adonan tepung dan isi lubang itu dengan mentega cair, susu yang sudah dicampur ragi, dan kuning telur.
5. Campur semuanya sambil dengan pelan-pelan ditambahi susu (dapat dicampur dengan air kalau mau). Semuanya harus dicampur dengan merata sampai tidak ada sedikitpun gumpalan. Mungkin kau bertanya, seberapa keras adonannya? Seberapa banyak susu? Adonannya harus keras, pikirkan pancake, dan adonannya harus jadi lebih keras dari itu.
6. OK, sekarang dengan pelan-pelan, campur busa dari putih telur ke dalam adonan… dan… STOP! Cukup mencampurnya.
7. Mungkin sekarang kalian sudah kelaparan, namun bagian tersulit dari resep ini baru akan dimulai – tinggalkan adonannya dalam suhu ruangan dalam jangka waktu yang lama. Seberapa lama? Hingga volume adonan berkembang menjadi dua kali lipat atau bahkan tiga kali lipat! Aku sudah mengingatkanmu untuk memakai baskom yang SANGAT BESAR. Kalo kamu sedang terburu-buru, ya tunggulah sampai 1 jam. Tapi jika kamu bisa, buat adonan wafel di malam hari dan tinggalkan adonannya semalam penuh sampai besok.
8. Gunakan minyak untuk melicinkan alat pembuat wafel (yang harus sangat panas! Panas! Panas!) supaya wafelmu tidak lengket. Tuangkan adonan di alat pembuat wafel, bakar hingga menjadi coklat keemasan.
9. Beri topping yang kau suka (maple syrup, es krim, berry, pisang, madu, dst…), dan nikmati wafel Belgiamu! ^^

Aku jamin jika langkah-langkah ini kau jalani dengan tepat, maka rasa wafelmu akan menjadi tiada tandingannya! Try it at home!
Macam Macam Es Krim Magnum
tentu saja, hampir semua orang tau, es krim magnum yang super mahal dengan rasa yang menajubkan, es krim yang dilapisi coklat belgian dengan berbagai rasa itu mantab, tapi sayang saya belom perna makan Magnum :(
dan apakah anda tau? di Indonesia hanya ada beberapa jenis magnum yang ada, langsung aja cekidot
Magnum GOLD (limited edition)

Magnum limited edition, es krim vanilla yang dilapisi dengan coklat keemasan yang tampak menggoda untuk dicoba.
Magnum Mint

Dingin!! kata yang tepat untuk menggambarkan magnum jenis ini.
es krim vanilla mint dilapisi dengan coklat yang sama seperti yang ada di magnum classic.
Magnum Almond (ada di Indo)

Magnum jenis ini juga suka aada di alf*mart or ind*maret, dengan harga yang sama dengan magnum classic belgian chocolate.
potongan potongan almond di bagian lapisan coklatnya terasa begitu khas! siapa yang mau???
Magnum Double Caramel

Rasa vanilla di es krim ini tetap sama seperti magnum yang lainnya. yang membedakannya hanya 1. lapisan coklat diluarnya. itu DOUBLE!
bagian dalam dilapisi coklat karamel yang menggiurkan dan bagian luarnya dilapisi lagi dengan coklat magnum yang ngebuat kita melting
Magnum Classic (ada di Indo)

Nah, siapa coba yang ga tau magnum jenis ini?ini biasa dijual di ind*maret or alf*mart dengan harga 10rb saja.
es krim vanilla ini dilapisi dengan belgian chocolate yang ngebuat orang pasti pengen makan ini lagi dan lagi.
Magnum Ecuador Dark

Magnum yang mempunyai ciri khas di bagian lapisan luarnya. yaitu terbuat dari kandungan kakao 62% yang membuat warnanya paling gelap diantara jenis magnum yang lain
Magnum Temptation Almond and Caramel

kombinasi es krim vanili dengan potongan almond California serta saus karamel yang lembut lalu dilapisi coklat Belgian di sekitarnya.
Magnum Temptation Chocolate

Es krim coklat yang diperkaya dengan saus coklat mewah dan berlimpahnya potongan coklat putih juga potongan brownies dan tak lupa di bagian luar dikelilingi oleh lapisan coklat yang yummy
Magnum White

Magnum yang 1 ini perfect banget bagi yang ga suka sm coklat milk or dark. Es krim vanilla ini disiram begitu saja dengan coklat leleh warna putih. woow! siapa coba yang ga mau?
Magnum Mini's

Magnum yang berukuran setengah dari magnum biasa ini sangat menggoda dengan 3 rasa yang ditawarkan, ga cukup 1 kan?
Acorn Squash Soup with Swiss Crostini

There’s nothing I love more during the cool fall months than cozying up to a bowl of hot, homemade soup. And this recipe from Sargento for a deliciously thick, spicy acorn squash soup topped with a crusty slice of toasted baguette and Swiss cheese is one of my early favorites for the soup-making season.

The texture of the soup is velvety and rich, but without heavy cream. Two tablespoons of butter is as sinful as this soup gets, and the rest is nutritious, wholesome, and absolutely scrumptious! Just microwave a whole acorn squash for 7 minutes, scoop out a bit of the soft center, and get making the super simple soup. Pour a portion back into the empty squash shell, top with a toasted baguette, and layer on a slice of Sargento Deli Style Sliced Baby Swiss cheese, which is the perfect size and creamy consistency for this mouthwatering soup. Broil the whole thing to create a nice, melty top and sprinkle with a bit of cayenne for presentation and a palate-pleasing flavor!
I know you’ll love this delicious meal idea just as much as I did, especially if you’re trying to keep warm on the snowed-in East coast. Regardless of the weather where you are, though, a warm, bubbling acorn squash soup is just what you need to enjoy a bit of the brisk fall season in a bowl!
Acorn Squash Soup with Swiss Crostini
Serves 4
Ingredients
1 large (1-1/2 to 1-3/4 lb.) acorn squash
2 Tbsp. butter or margarine
1/2 small onion, chopped
10 oz. chicken broth
1/4 tsp. nutmeg
1/8 tsp. cayenne pepper (optional)
1/4 tsp. salt (optional)
4 small slices Italian or sourdough bread (3 inches in diameter), toasted
4 slices Sargento® Deli Style Sliced Baby Swiss or Jarlsberg Cheese
Directions
Place whole squash on paper towel in microwave oven; cook on HIGH 4 minutes. Carefully turn over with pot holders; continue cooking 3 minutes more or until squash is barely tender when pierced with a knife. Let stand 5 minutes.
Melt butter in large saucepan over medium heat. Add onion; cook 5 minutes or until onion is soft, stirring occasionally. Cut squash in half; scoop out and discard seeds and membrane. Keeping squash shell intact, scoop out flesh, leaving 1/4-inch thick shell. Add squash pulp to onion mixture; cook 1 minute. Add chicken broth, nutmeg and, if desired, cayenne pepper and salt; bring to a boil. Reduce heat; simmer, uncovered, 10 minutes or until squash is very tender, stirring occasionally.
Transfer squash mixture to food processor and process until smooth, or whiz with an immersion blender until soupy; add more chicken broth to thin, if needed. Reheat soup on low heat until very hot, just a few minutes. Arrange squash shells, cut sides up, in ovenproof bowls; place bowls on baking sheet; fill with hot soup. Top with toast and cheese. Place under preheated broiler 5 inches from heat; broil 3 minutes or until cheese is melted and golden brown.
Grilled Chicken Sandwich with Avocado Relish

Grilled Chicken Sandwich with Avocado Relish
Serves 4
Sandwich
4 white or whole-wheat hamburger buns
4 boneless skinless chicken breasts, marinated (see recipe for marinade)
4 slices pepperjack or cheddar cheese
2 tomatoes, sliced
A few handfuls of spinach
Marinade for Chicken
¼ cup olive oil
1 tsp. salt
1 tsp. freshly ground pepper
1 tsp. chili powder
½ tsp. cumin
½ tsp. garlic powder
Relish
1 avocado, pitted and diced
1 cucumber, diced
1 tsp. lime juice
1 tsp. freshly chopped cilantro (I used dried)
1 tsp. crushed red pepper flakes
Salt and freshly ground black pepper
Combine all ingredients for marinade in a large bowl and whisk. Place chicken breasts into a plastic bag and pound flat. Add chicken to the bowl and marinade for at least 1 hour, or up to 24 hours.
For relish, toss avocado and cucumber with lime juice, chopped cilantro, and crushed red pepper. Mash together. Season with salt and pepper. Mix well. Refigerate up to 1 hour before use.
Preheat grill to full heat. Grill chicken for 2-3 minutes per side in direct heat. Lower heat to medium and grill for 5 minutes per side. Transfer to a plate, top with pepperjack cheese slices and cover with aluminum foil.
Slice tomato and arrange tomato and spinach on a plate. Spray the inside of hamburger buns with cooking spray and toast for 3 minutes, or until lightly brown.
Serve chicken on buns. Top with tomato, spinach, and relish.
How To: Make Vanilla Whipped Cream

During holidays and special occasions, I rarely remember squirting a fat dollop of Reddi-Whip onto my mother's delicious strawberry shortcakes and fruit pies. Why commit store-bought injustice against your own prized pie? Come on, now. You already know that freshly whipped cream tastes WORLDS better, so get out your beaters and get at it!
Making your own whipped cream involves three ingredients - heavy whipping cream, vanilla extract and powdered sugar. Those three things and ten minutes is all you need to make a big difference in your next dessert!
Vanilla Whipped Cream
Makes 2 cups
Ingredients
1 cup heavy whipping cream
1/2 tsp vanilla extract
1/4 cup powdered sugar
Directions
In a chilled, medium-sized bowl and using chilled beaters, beat cream until it begins to thicken. Add powdered sugar and vanilla, and beat until soft peaks form. Store in the refrigerator.
That is all there is to it! There are hundreds of variations that you can make for this basic recipe (add chocolate, orange flavor, lemon flavor, almond, mint… ), so feel free to get creative.
Jalapeño Cornbread with Honey-Lime Butter

My husband and I spent pretty much the entire weekend in swimsuits, walking along the beach, napping in the warm sun, and eating out for most of Friday and Saturday while we were staying in Pismo Beach. That's why, once Sunday rolled around and we were back home, I was feeling a little winded but ready to cook something simple, summery and fresh. For our Sunday spread, I laid out a tangy Chicken Tortilla Soup with avocado and lime and this subtly spicy and moist cornbread to go along with it. Easy, delicious and... well, not the route I'd typically go on the first 82-degree day of the year (Popsicles for dinner, anyone?).
Thankfully, I only needed to fire up our little toaster oven to 375 degrees for a perfect cornbread, but we had all the windows open just in case any heat escaped!
The jalapeño cornbread made for a mild but oh-so-scrumptious side dish to the spicy soup, and the honey-lime butter was a very fresh and light spread. The best thing about this cornbread is that you can easily omit the jalapeños altogether and it would still be delicious!
I know I'll definitely be making this again, and I hope you'll try it along with the Chicken Tortilla Soup, or any other of your favorite spicy soups!
Jalapeño Cornbread
Printable Recipe (includes Honey-Lime Butter)
Ingredients
2 jalapenos
2/3 cup sugar
1/2 cup melted butter
2 large eggs
1/2 tsp. baking soda
1 cup buttermilk
1/2 tsp. salt
1 cup yellow cornmeal
1 cup flour
Directions
Preheat the oven to 375 degrees. Remove the seeds from and slice jalapenos finely. Set aside.
In a medium bowl, stir sugar and butter together. Whisk in eggs. Whisk in baking soda and buttermilk. Add salt, cornmeal, and flour. Do not overmix. As soon as the flour disappears, stop mixing. Add jalapeno slices.
Add batter to a greased 8-inch baking dish and smooth out the batter. Bake for about 35 minutes, or until top is golden brown. Prick the center with a toothpick and make sure it comes out clean. If not clean, bake for about 5 more minutes.
__________________________
Honey-Lime Butter
Ingredients
1/2 cup soft butter, not melted
1 tsp. lime zest
1 tbsp. honey
Directions
In a small bowl, mix ingredients together. Serve with cornbread.
Caramelized Onion Dip

Caramelized Onion Dip
Ingredients
Chipotle Shrimp Tacos with Avocado Salsa

You can only eat so many servings of hearty soup, chili, potatoes and pasta before you start craving something a little more light. And, even if the fall season is fully upon us, I still crave fresh, summery flavors between all the pot pies and pulled pork... Don't we all?
With a big bag of shrimp in my freezer and all the ingredients to make a tasty taco with a light avocado salsa, last night's dinner was decided, and delicious!
The shrimp was marinaded in a subtley spicy mix of olive oil, lime juice and chili seasoning, and then sauteed on the stove top for just a few minutes. Beforehand, hubby helped me make a sensational avocado salsa with fresh Hass avocado, tomatoes, red onion, garlic, jalapeno and cilantro, which topped the tender shrimp on a corn tortilla. We added a few pinches of freshly grated Monterey Jack, Cheddar, and a dollop of sour cream, and after one, couldn't help asking for seconds!
This was a delicious, easy dinner and a quick, fresh fix for our taco craving... even if it is November. After all, variety is the spice of life!
Chipotle Shrimp Tacos with Avocado Salsa
Serves 4
Ingredients
Avocado Salsa:
3 tomatoes, diced
1 small red onion, diced
1 jalapeno, diced, seeds optional
2 garlic cloves, smashed
3 medium tomatillos, husked, rinsed, and diced
1 Hass avocado, cut into chunks
1 teaspoon kosher salt
½ teaspoon freshly ground pepper
1 lime, juiced
1/4 cup loosely packed fresh cilantro leaves, coarsely chopped
Shrimp Tacos:
1 tablespoon olive oil
½ teaspoon lime juice
1 teaspoon chipotle or blended chili powder (I used taco seasoning)
½ teaspoon kosher salt
1 pound medium shrimp (about 20), peeled and deveined
4-6 corn tortillas
4 sprigs cilantro, coarsely chopped
2 limes, cut into wedges
Shredded Monterey Jack and/or Cheddar cheeses, optional
Sour cream, optional
Directions
Avocado Salsa:
Dice all of the vegetables and combine. Add salt and pepper. Squeeze in the juice of 1 lime. Transfer to a bowl and stir in the cilantro. Let sit on the counter for about 15 minutes to allow flavors to combine. Store in the refrigerator up to 4 days.
Shrimp Tacos:
Mix the olive oil, lime juice, chili seasoning, and salt in a large bowl. Add the shrimp and toss to coat. Marinade at least 10 minutes and up to 24 hours, covered, in the refrigerator.
When ready to cook, heat a stovetop pan to medium-high. Add the shrimp and cook until translucent, about 2 minutes on each side.
Place tortillas on a plate and top with a damp paper towel; warm in the microwave for 20 seconds. Top tortillas with cooked shrimp, avocado salsa, a little chopped cilantro, shredded cheese and sour cream. Serve with lime wedges.
How To: Boil Potatoes Faster

• 1/2 tsp. salt
• 2 tbsp. balsamic vinegar
Yes, balsamic vinegar - That's it! It cuts the boiling time in HALF. If you don't have some already, just buy a cheap variety at the grocery store because this isn't about taste, it's about efficiency! And don't worry, the vinegar doesn't leave the potatoes with any kind of funky, unpleasant taste once you strain them. It's just as easy as that. They'll be done in about 20 minutes and reading for mashing.
Pasta Salad with Tomatoes, Zucchini and Parmesan

Pasta Salad with Tomatoes, Zucchini and Parmesan
Serves 8
Ingredients
12 ounces farfalle (bowtie) pasta
3 tablespoons extra virgin olive oil, divided
1 whole lemon (more to taste)
Salt
Freshly ground black pepper
2 whole zucchini, cut into small wedges or diced
10 ounces grape tomatoes, halved lengthwise
4 scallions, chopped finely
1/4 cup freshly grated Parmesan cheese
Directions
Cook pasta according to package instructions, or until al dente. Drain and rinse in cold water until completely cool. Add 2 tbsp. olive oil and lemon juice, then add salt and pepper to taste (do not under-salt). Toss to combine.
Heat remaining 1 tbsp. olive oil to medium in a stovetop pan, and add zucchini. Salt and pepper lightly, cooking and stirring for 5 minutes. Add to the pasta along with the tomatoes, scallions and parmesan, and toss to combine. Add more of what you think it needs; I like to go heavy on the Parmesan! Squeeze in a little more lemon juice, or drizzle more olive oil if it needs more moisture.
Cover and refrigerate for at least a couple of hours before serving.
*Note: Add grilled shrimp, chicken, or steak if you need a little protein.
Rigatoni Peperonata

Rarely does a meatless dish make for a happy husband at the dinner table. But, as Mark has been brave taste-tester and willing participant, he doesn't mind when I change things up a bit, and sometimes even likes the end result.
However, as I was cooking this delicious pasta dinner on Tuesday, I couldn't help but notice his expression go from, "Hot damn, something smells delicious in here!" to "Oh, really?" when I mentioned that there would be no meat involved in that night's meal.
Well, surprise, surprise, the courageous carnivore didn't leave behind a single pine nut on his plate! He gobbled the whole thing up and then went for seconds. Who could blame him, what with the sweet sauteed bell peppers, crunchy pine nuts and tangy capers, topped with freshly chopped parsley, basil and creamy Parmesan cheese. Yum!
The meal was a total hit, totally satisfying and a definite eye-opener for both me and my meat-lovin' man. Maybe I'll try to sneak in some more vegetarian meals and see if he notices before he takes a bite . . . Oh, the possibilities.
In the meantime... It's chicken and steak leftovers for dinner tonight!
Rigatoni Peperonata
Serves 4
Ingredients
1/4 cup pine nuts
12 ounces rigatoni (3/4 box)
1/4 cup olive oil
2 bell peppers (preferably red and yellow), cut into 1/2-inch pieces
2 tablespoons chopped capers
2 tablespoons red wine vinegar
1/4 teaspoon crushed red pepper
kosher salt and black pepper
1/4 cup chopped fresh flat-leaf parsley
1/4 cup chopped fresh basil
Grated Parmesan cheese, to taste
Directions
Heat oven to 400º F. Spread the pine nuts on a rimmed baking sheet and toast, tossing occasionally, until golden brown, 3 to 4 minutes. Cook the pasta according to the package directions.
Meanwhile, heat olive oil in a large skillet over medium-high heat. Add the bell peppers and cook, stirring occasionally, until tender, 5 to 6 minutes. Add the capers, vinegar, crushed red pepper, and ¼ teaspoon each salt and pepper, and cook, stirring, until heated though, 1 to 2 minutes.
Add the pasta and pine nuts to the skillet and cook, tossing, for 1 minute. Add parsley, basil and Parmesan cheese. Serve.
Lamb Chops with Garlic-Rosemary Sauce

Besides the complete and total disaster that was Thanksgiving dinner of 2007, in which Mark and I tried to roast a twelve-pound turkey on a cookie sheet, I don't recall ever cooking many meats in my kitchen besides chicken, beef or pork. I mean, those are pretty all-encompassing meats... you can do a lot with them. But, as I've grown up, my palate has also done a little growing up, and I decided it was about time to leave my comfort zone and introduce a new meat to our dinner table. So, I went on a quest to the store looking for something, but not sure what. I guess it was just my luck that, yesterday only, a package of four lamb chops was on sale for four dollars. Bingo!
I had never cooked lamb, so I was a little nervous that I wouldn't get it right the first time. Much to my surprise, though, it couldn't have been easier! The lamb was perfectly pink and tender after only six minutes of pan-searing, and the garlic-rosemary butter sauce drizzled over the meat made it ever more moist and mouthwateringly "mmm."
Similar to when you're pan-searing beef, you should always pat the lamb dry to soak up excess moisture and get that nice brown color. I served it with some roasted potatoes and sautéed zucchini. Otherwise, the photo pretty much speaks for itself - Look at what you can do with a few chops, some basic ingredients, and just six minutes!
Lamb Chops with Garlic-Rosemary Sauce
Serves 4
Printable Recipe
4 lamb loin chops
Salt and freshly ground pepper, to taste
2 tablespoons olive oil
2 garlic cloves, chopped
3 tablespoons crushed rosemary, divided
2 tablespoons fresh lemon juice
½ cup chicken stock
1 tablespoon butter
Pat lamb dry and season with salt, pepper and 1 tbsp. crushed rosemary. In a large skillet or cast iron pot, heat oil over medium-high heat until hot but not smoking, and sear lamb 3 minutes. Turn lamb over and sear 2 minutes more for medium-rare. Transfer lamb to 4 plates.
Add garlic, 2 tbsp. rosemary, lemon juice, and stock to skillet and deglaze over high heat, stirring and scraping up brown bits for 2 minutes. Whisk in butter. Pour sauce over lamb, or serve on the side in small individual bowls.
Serve with roasted potatoes and a sautéed vegetable, such as asparagus or zucchini.
Lamb Chops with Garlic-Rosemary Sauce
Besides the complete and total disaster that was Thanksgiving dinner of 2007, in which Mark and I tried to roast a twelve-pound turkey on a cookie sheet, I don't recall ever cooking many meats in my kitchen besides chicken, beef or pork. I mean, those are pretty all-encompassing meats... you can do a lot with them. But, as I've grown up, my palate has also done a little growing up, and I decided it was about time to leave my comfort zone and introduce a new meat to our dinner table. So, I went on a quest to the store looking for something, but not sure what. I guess it was just my luck that, yesterday only, a package of four lamb chops was on sale for four dollars. Bingo!
I had never cooked lamb, so I was a little nervous that I wouldn't get it right the first time. Much to my surprise, though, it couldn't have been easier! The lamb was perfectly pink and tender after only six minutes of pan-searing, and the garlic-rosemary butter sauce drizzled over the meat made it ever more moist and mouthwateringly "mmm."
Similar to when you're pan-searing beef, you should always pat the lamb dry to soak up excess moisture and get that nice brown color. I served it with some roasted potatoes and sautéed zucchini. Otherwise, the photo pretty much speaks for itself - Look at what you can do with a few chops, some basic ingredients, and just six minutes!
Lamb Chops with Garlic-Rosemary Sauce
Serves 4
Printable Recipe
4 lamb loin chops
Salt and freshly ground pepper, to taste
2 tablespoons olive oil
2 garlic cloves, chopped
3 tablespoons crushed rosemary, divided
2 tablespoons fresh lemon juice
½ cup chicken stock
1 tablespoon butter
Pat lamb dry and season with salt, pepper and 1 tbsp. crushed rosemary. In a large skillet or cast iron pot, heat oil over medium-high heat until hot but not smoking, and sear lamb 3 minutes. Turn lamb over and sear 2 minutes more for medium-rare. Transfer lamb to 4 plates.
Add garlic, 2 tbsp. rosemary, lemon juice, and stock to skillet and deglaze over high heat, stirring and scraping up brown bits for 2 minutes. Whisk in butter. Pour sauce over lamb, or serve on the side in small individual bowls.
Serve with roasted potatoes and a sautéed vegetable, such as asparagus or zucchini.
Mini Caprese Salad Bites

Caprese salad is one of my absolute favorite dishes, and one that really epitomizes summer, in my opinion. It’s good every which way – splayed out on a plate, piled high, or in these little bites, smothered with the lovely marriage of a good-quality balsamic vinegar and olive oil. Fresh, juicy, colorful and flavorful… what’s not to love?
Not to mention, it can help make you friends!
I brought this bountiful plate to a happy hour gathering in our new neighborhood last Friday, where we met so many welcoming, friendly people (If you’re reading, hey neighbors!) while enjoying a lot of delicious dishes and drinks. I was paying more attention to our new friends than the food, but before I knew it, these bites were gone! Not only were they easy and quick to put together, but everyone seemed to enjoy them, too. Drizzled with olive oil, balsamic vinegar, salt and pepper, and assembled in 20 minutes, this was a simple, scrumptious little appetizer that will appeal to anyone!
In the future, I think I’ll add some proscuitto or sun dried tomatoes to the bites, but I think you’d agree they’re super delicious just as is. Try them the next time you have pals over or need to bring a fancy but non-fussy appetizer to the table!
Mini Caprese Salad Bites
Makes 50 bites (enough for up to 20 people)
Ingredients
1/4 cup olive oil
1/8 cup balsamic vinegar
Coarse salt
Freshly ground pepper
24 oz. cherry tomatoes, rinsed and pat dry
Fresh basil, about 20 leaves
16 oz. mozzarella ciliegine (small mozzarella balls), marinated in oil or resting in water
50 toothpicks, cocktail forks or small bamboo skewers
Directions
In a small bowl, combine olive oil, balsamic vinegar, and a generous pinch of coarse salt and freshly ground pepper. Whisk together and set aside.
Arrange ingredients and a platter for serving. Assemble the bites on a toothpick by starting with one basil leaf, then one cherry tomato, one mozzarella ball, and another basil leaf. Place on the platter and repeat process until no more ingredients remain
Bourbon Bread Pudding with Caramel Sauce


Some people have said that eating bread pudding is like receiving a good, warm hug. So, since I’ve been wanting to try bread pudding and, frankly, could have used a hug, I knew it was the perfect dessert to snuggle up with.
After toasting a cut-up loaf of French bread, soaking it in a mixture of egg, milk, brown sugar, bourbon, vanilla and raisins, it was ready to bake. Drizzled with a little caramel sauce, I scarfed on a serving while reading outside and enjoyed every warm, flavorful bite.
The bourbon in this bread pudding is very subtle and was really complimented by the sweetness of the brown sugar and my homemade vanilla extract. The juicy raisins added a slight tartness, and the caramel… Do I really need to explain the pure bliss that is caramel sauce? I think you know.

Even though this delicious dessert (or breakfast) can’t help a heart in need of her husband, it certainly gave me the temporary feeling of being “hugged.” I can’t wait to enjoy this with him when he gets back, and I know you would really enjoy it, too!
Bourbon Bread Pudding with Caramel Sauce
Makes 3-4 servings
Ingredients
1 (8-ounce) loaf unsliced French bread
1 cup milk
1/4 cup firmly packed brown sugar
1/8 cup bourbon
1 teaspoon vanilla extract
1 eggs
1/3 cup raisins
Cooking spray
1/4 cup caramel sauce, homemade or store-bought
Directions
Trim crust from bread using a serrated knife, and discard crust. Cut bread into 1-inch cubes. Arrange bread cubes in a single layer on a baking sheet. Bake at 350° for 12 minutes, or until toasted.
Combine skim milk, brown sugar, bourbon, vanilla extract, and eggs in a bowl; stir well. Add bread cubes and raisins; toss gently. Cover and chill 45 minutes.
Spoon mixture into a 9-inch square baking dish coated with cooking spray. Cover and bake at 350° for 20 minutes. Uncover and bake an additional 10 minutes or until pudding is set.
Pour caramel sauce a small, microwave-safe bowl. Microwave for 30 seconds, or until warm. Serve with bread pudding.
Enjoy!

When dinner burns, housework never seems done and life generally just isn’t going your way, there’s always dessert. Make it yourself, or go out and get it however you can. Just rejoicing in one simple, heavenly bite of something chocolaty, cakey and down right delicious can make a bad day go right.

Life has been anything but fancy lately, but I wanted to inject a little sweetness into our daily routine with these sinful, scrumptious cupcakes. The soft cake, filled with sweet homemade caramel was perfectly moist. Swirled with the rich chocolate buttercream with a hint of deep, dark bourbon flavor, they were to die for.

These little candied caramel rounds didn’t hurt the look of the cupcakes, either! I created them by just drizzling a little caramel onto a lined baking sheet (either parchment or silicone lining are fine), sprinkling a little coarse salt on top, and letting them harden. Then, I just gently scooped them up and stuck ‘em into the cupcake. Fancy schmancy and super simple. Trust me, if I could do it, you can too!

Whether as a special Father’s Day treat for Dad, or as a sinfully yummy sweet for yourself, family or friends, these cupcakes will hit the spot! The cake is fluffy and flavorful, and the chocolate bourbon buttercream is like nothing you’ve ever tasted. Try them for yourself and you’ll see what you’ve been missing!
Salted Caramel Cupcakes:
Makes 15 cupcakes
Ingredients
1 1/2 cups all-purpose flour
1 teaspoon baking powder
1/4 teaspoon sea salt
1 stick of unsalted butter, at room temperature
1 cup plus 2 tablespoons packed light brown sugar
2 large eggs, at room temperature
1 teaspoon vanilla
1/2 cup plus 2 tablespoons buttermilk
Directions
Preheat oven to 325 degrees. Line muffin tins with papers. Combine flour, baking powder and salt; set aside.
Cream butter and brown sugar on medium-high speed until pale fluffy. Add eggs, one at a time, beating until each is incorporated. Add vanilla. Mix and scrape down sides of bowl as needed. Add flour mixture in three batches, alternating with two additions of buttermilk, and beating until combined after each.
Divide batter evenly among lined cups, filling each about halfway full. Bake for about 25 minutes. When done, transfer tins to wire racks to cool 10 minutes; turn out cupcakes onto racks and let cool completely.
_________________
Chocolate Bourbon Buttercream:
Makes about 4 1/2 cups
Ingredients
8 oz. unsweetened chocolate, chopped
6 cups confectioners' sugar
16 Tbsp. (2 sticks) unsalted butter
6 Tbsp. milk, plus more, if needed
2 tsp. vanilla extract
1/4 tsp. salt
2 tsp. good-quality bourbon whiskey
Directions
Melt the chocolate and cool to room temperature.
With an electric mixer, combine the confectioners' sugar, butter, milk, vanilla and salt, and beat on low speed until combined, about 1 minute. Stop the mixer and scrape down the sides of the bowl. Increase the speed to medium and beat for 2 minutes, then reduce the speed to low. Add the chocolate and bourbon, and beat until combined, then increase the speed to medium and beat for 1 minute more.
If the frosting is dry, add more milk, 1 tsp. at a time, until it is creamy but still holds peaks.
Candied Salted Caramel Rounds:
Ingredients
1 1/4 cups granulated sugar
1/4 teaspoon sea salt
3/4 cup water
2-4 tablespoons of large-crystal sugar
Directions
Lay out a large piece of parchment on your work surface and spray with cooking oil (such as canola). Fill a large tub (or your sink) partially full of ice water.
Put sugar, salt and cold water in a heavy pan; stir over low heat until sugar dissolves. Increase heat and bring syrup to a boil. Lower heat slightly and swirl the pan once or twice so the syrup colors evenly; do not stir. When caramel is a deep amber color, plunge the base of pan into iced water for about 2 seconds to stop further cooking.
Dip a spoon in the caramel and let it fall onto the parchment paper in a drizzle. Move the spoon in a circular motion as the syrup falls from the spoon. Repeat 15 times. When caramel has hardened (it will still be sticky) sprinkle over large-crystal sugar. Remove from paper and adorn cupcakes.
Kamis, 01 Desember 2011
Maya Gold
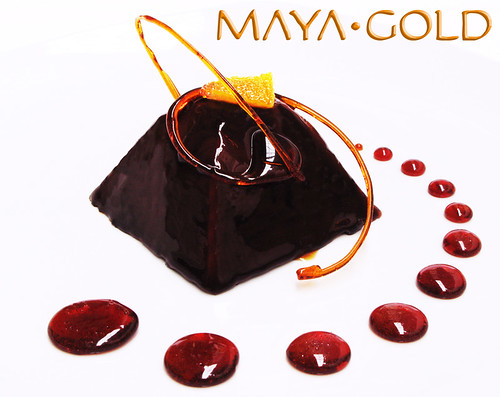
Remember when I said (uh, just two days ago) that I would no longer be eating desserts not made by myself? The problem with that is, if you're a home baker with a desire to learn, if you want to lose any weight, your stint is pretty much over. Also, this blog would instantly die (well, I could still make non-desserts, but let's face it, desserts are mad fun: food of artists). The solution is to torture myself with the ambition to make entremets. Or not just an entremet, but a plated dessert. It will take me literally days to make one, is plenty of work, and pushes all your culinary skills to the limit while learning more.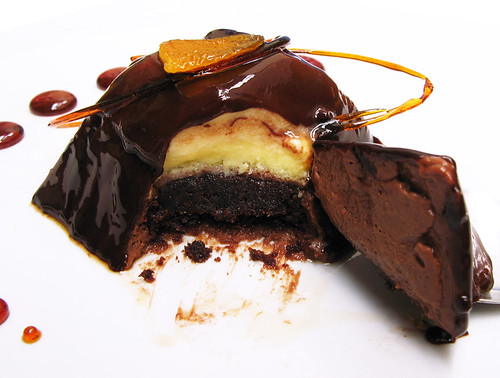
The entremet is an orange crème brûlée with dark chocolate orange mousse, fudge brownie base, and enrobed in chocolate mirroire glacage. The decorations are candied orange peel and caramel doodads (not a technical term). It's not an original concept, I was inspired by the Amore of the Bizu Patisserie. However, I've never tasted that entremet and this is my original interpretation, construction, and recipe. So it's not quite, but almost a "signature" dessert, I guess. What's most important, though, is that it tastes smashing. The depth of the brownie, the lightness of the crème brûlée, and the character of the orange chocolate mousse work together splendidly. I didn't show my parents the plating of the dessert, they just got the regular glazed entremet. If they saw it, they might become fearful for my future, hahaha (oh, don't take that seriously). Just because you're a good doctor doesn't mean you can let your artistic soul just die! Speaking of which, I just received a new commission to make another Obstetrics and Gynecology poster, which I'm both excited and scared about, as usual.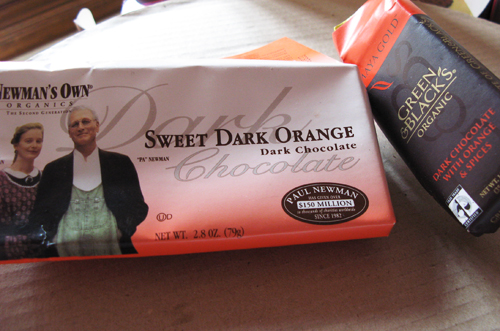
Because milk chocolate orange gets such a bad rap, I used organic dark chocolate with orange (bought at Healthy Options, THE health food store in the Philippines) for a sophisticated flavor, making this the most expensive dessert I've produced. Here we have the pleasant and lower-priced Newman's Own Organic Sweet Dark Orange and the more expensive but totally worth it Green and Black's Organic Maya Gold, which is the inspiration and namesake of my dessert. The Maya Gold, and I'm not being a chocolate snob or inciting a UK-vs-US choco-battle here, is superior in every way except price-- mouth feel, depth, and flavor. The spices are all secret, but I'll wager there's pepper, cinnamon, and cloves in there. However, the Newman's Own chocolate is still very good, and while not as interesting flavor-wise, is still a quality choice. Ready? Let's go make entremets!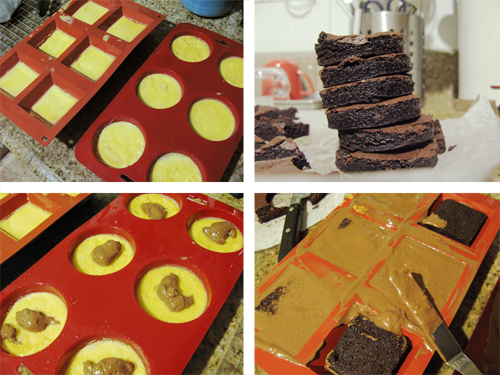
This dessert can be constructed in an entremet ring, but since the inspiration was "Maya Gold," there's no better shape than pyramidal, so I used silicon molds (about 3" demisphere and 3" flat-topped pyramid), sold for P700 ($17 or £7, at Robinson's Manila and SM Makati).
Orange Crème Brûlée (adapted from Sherry Yard's The Secrets of Baking)
Preheat the oven to 150°C (300°F).Stir the cream, sugar, vanilla, and orange zest in a heavy saucepan over medium heat until the sugar is dissolved and bring to a simmer. Let it rest for 15 minutes. During that time, in a large mixing bowl, whisk together 6 egg yolks. Once the cream has rested, drizzle it in slowly into the yolks, whisking all the while, and once half a cup has gone in, you can add it more liberally, still whisking the whole time. Whisk until well-blended. Strain into a pitcher. Divide among the 12 silicon containers (if you want to serve it as is, just use 6 ramekins)-- they should leave enough space for the brownie and mousse, so you only want each one filled to 2/3 or 3/4 of the capacity. Place the containers in a large roasting pan and fill the roasting pan with boiling water going to 2/3 of the height of the silicon container. Be careful that water doesn't enter the custard, especially as you place it in the oven. Bake for about 25 minutes-- that's the time you should start checking it, at least-- until the center is jiggly but not sloshy. If it's not yet done, just check again at 5 minute intervals. Take it out of the oven, taking care not to get the custards wet. Let them cool, cover with plastic wrap, and freeze in their containers.
Dark Chocolate Orange Mousse
Sprinkle the gelatin over the water in a small bowl and set aside. In the microwave or a very small saucepan, bring the 33g cream to a boil and pour over the chocolate. Stir until all the chocolate has melted and set aside. In a heatproof bowl set over simmering water (not touching the bottom of the bowl), whisk together the egg yolk and sugar until no longer grainy. Add the softened gelatin and whisk until well-blended and smooth. Take the bowl off the heat and whisk in the chocolate ganache and 150g cream until well-blended. Do not store in the refrigerator because it will set-- continue assembling the dessert instead. This mousse can also be eaten on its own.
Fudge Brownies (adapted from King Arthur's The Baker's Companion)
Preheat the oven to 175°C (350°F). Grease, line with parchment, and grease again a 9x13" pan. In a microwave-safe bowl or saucepan over very low heat, melt the butter, then add the sugar and stir to combine. Stir in the cocoa, salt, baking powder, and vanilla. Cool until you can comfortably test it with your finger (it should feel like comfortably hot bath water). Whisk in the eggs madly until smooth, then add the flour, stirring until smooth. Spoon into the prepared pan and bake for 25 minutes, or until a cake tester or knife poked in the middle shows only moist crumbs. Cool for 15 minutes on a rack, then pull out the brownies with the parchment in one piece and let cool completely.
Chocolate Glacage: follow the recipe here.
Assembly:
Take the crème brûlées out of the freezer and pipe or spoon a thin layer of mousse on the surface. Don't be lazy as I was and just put a dollop in the center; the seam will show. You really have to make sure it reaches the edges. Using a round biscuit cutter (for demispheres) or a knife (for pyramids), cut the brownie into 2.5" rounds or 2.25" squares-- the measurement doesn't matter as long as it is not flush with the sides of the mold. Use the remaining mousse to completely fill the mold and swipe a spatula over the top to level it. Cover with plastic wrap and freeze a few hours until firm-- it can be frozen for a week, away from strong odors.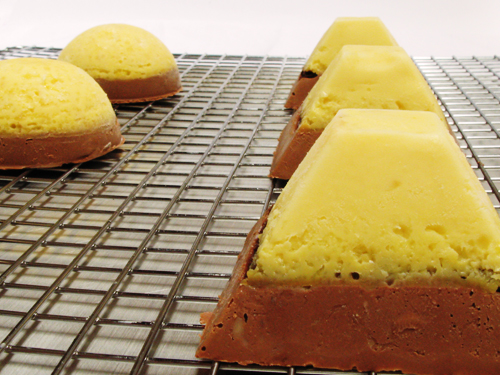
Pop the prepared entremets out of the molds and set on a cooling rack or dipping tray over a sheet pan. Allow any frost to thaw, about 15-30 minutes. To save on glacage, I elevated the cooling rack and placed a small bowl on the bottom for recycling.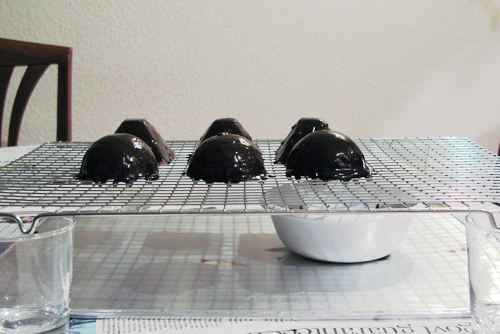
Working quickly, pour the glacage over the top of each. It's advisable to glaze them at least twice for a smoother finish: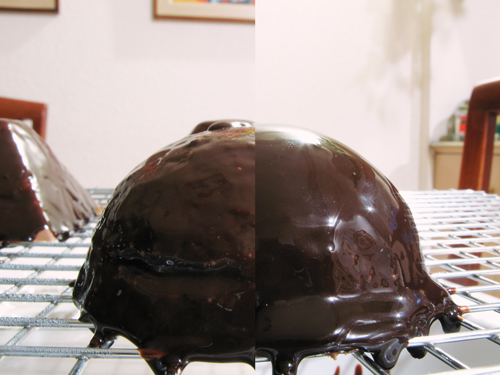
Leave in the refrigerator until serving time.
Candied Orange Peel (adapted from Chocolate Desserts by Pierre Hermé)
Put a large pot of water (not the quantity specified here, that is to be used later) to a boil. Cut off a thin slice off the bottom and top of the oranges and cut off wide bands of peel about 1 inch across, making sure that a sliver of fruit is included in the peel as you cut it off. Toss in the boiling water and boil for two minutes, then remove from the water with a slotted spoon into a colander and rinse under cold running water for 2 minutes, then repeat the boiling and cooling process twice more. Set aside. Place the remaiing ingredients (water, sugar, and all) into a large saucepan and bring to a boil. Add the peel and adjust the heat to very low so the syrup simmers gently. Allow to simmer, stirring occasionally, for 1-1/2 hours. Remove the casserole from heat, and with the cover still on, allow to macerate overnight. The next day, pour into a canning jar and store in the refrigerator for up to 3 weeks. It can also be dried on a rack and coated in sugar.
To make the caramel, I have to confess there is no recipe-- I just "winged it." I placed half a cup of sugar and a quarter cup of water into a medium saucepan and let it boil until it reaches a deep amber color, then plunged the bottom in cold water to stop cooking. When the syrup cools enough to run from a spoon in a thread (if it drips, it's too hot), take the loaded spoon and create all sorts of designs on a nonstick sheet pan or parchment paper and allow to cool. I used "jewel" shapes and swirls to keep in theme.
Read more: http://manggy.blogspot.com/2008/01/maya-gold.html#ixzz1fLv4TztB